5 Coffee Art Tools and Techniques To Make Beautiful Lattes at Home

We may earn a commission for purchases made using our links. Please see our disclosure to learn more.
Ever seen a latte with a heart or rosetta on top and thought, “I wish I could do that”? Many coffee lovers assume latte art is only for pros with fancy machines. That belief can make home brewing feel limiting. Luckily, there’s a better way. You don’t need barista training or expensive gear. With a few simple coffee art tools and a little practice, you can create stunning lattes right at home. This guide will show you the tools, techniques, and tips to help you pour like a pro—no coffee shop required.
The 5 Essential Coffee Art Tools You Need at Home
You don’t need a dozen gadgets. Just five tools can unlock your inner latte artist. Let’s dive into each one and how it helps transform your drink from simple to stunning.
1. Milk Frother – Your Texture Maker
If you want silky, microfoam milk that’s soft enough to pour and stable enough to draw on, a good milk frother is your first must-have. These handy devices whip air into the milk, creating a creamy texture that blends smoothly with espresso.
Whether you choose a handheld electric frother or a more advanced steamer wand, the goal is the same: to create a light, velvety foam that holds shape without being too airy.
Pro tip: Use cold milk and froth it just before pouring for best results. Whole milk gives the richest texture, but oat and almond milk can froth nicely too.
2. Latte Art Pen – Draw Like a Pro
Once your foam is in place, you’ll want a tool that lets you add detail. Enter the latte art pen—a small, pointed device used to “etch” designs into the milk foam. It works like a fine paintbrush, letting you drag and swirl lines to shape hearts, flowers, or even cartoon faces.
Pro tip: Dip the tip in chocolate or caramel syrup for bold lines, especially on cappuccinos or flavored lattes.
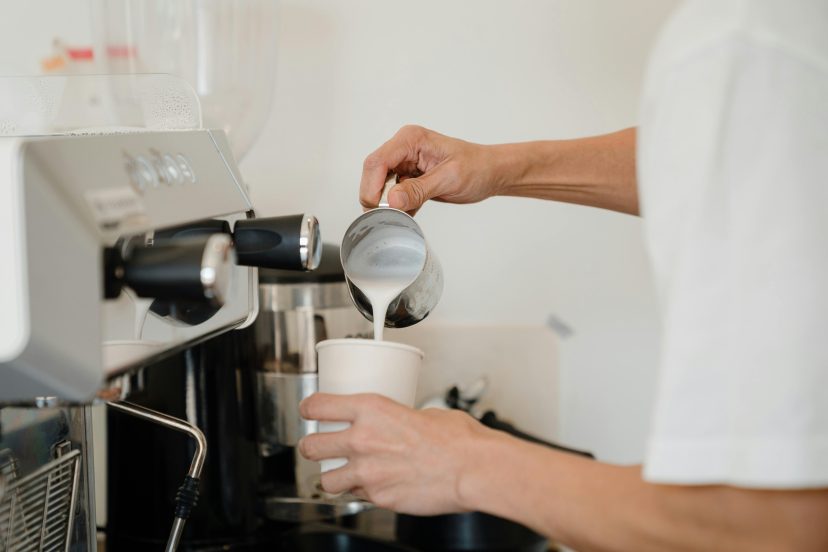
3. Steaming Pitcher – Precision in Every Pour
A stainless steel steaming pitcher gives you the control you need to pour milk with accuracy. Its shape, especially the spout, is crucial for free-pouring latte art. A well-designed spout allows you to direct your pour more precisely, which is key to creating hearts or tulips.
Look for a pitcher with a comfortable handle and a slightly pointed or narrow spout for best results.
Pro tip: Practice pouring water into an empty cup to get used to your pitcher’s weight and angle.
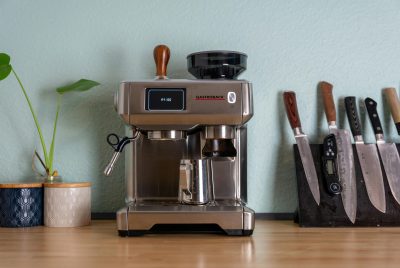
4. Espresso Machine – Your Coffee Canvas Starts Here
Espresso is the foundation of every latte. A shot of espresso creates a dark base with crema (the golden froth on top) that your foam art will float on. You can technically use strong coffee, but for best visual results, espresso is ideal.
Pro tip: Always use fresh, finely ground beans for the richest crema.
5. Coffee Stencil Set – Quick and Easy Patterns
Not ready to free pour? That’s totally fine. Coffee stencils make it easy to decorate your latte using cocoa powder, cinnamon, or matcha. Simply place the stencil over your cup and dust lightly for instant, picture-perfect results.
Pro tip: Use a fine mesh shaker for even powder distribution.
3 Latte Art Techniques That Even Beginners Can Master
Now that you’ve got the tools, let’s get into the fun part: the art itself. There are many ways to approach latte art, but these three methods are great for beginners.
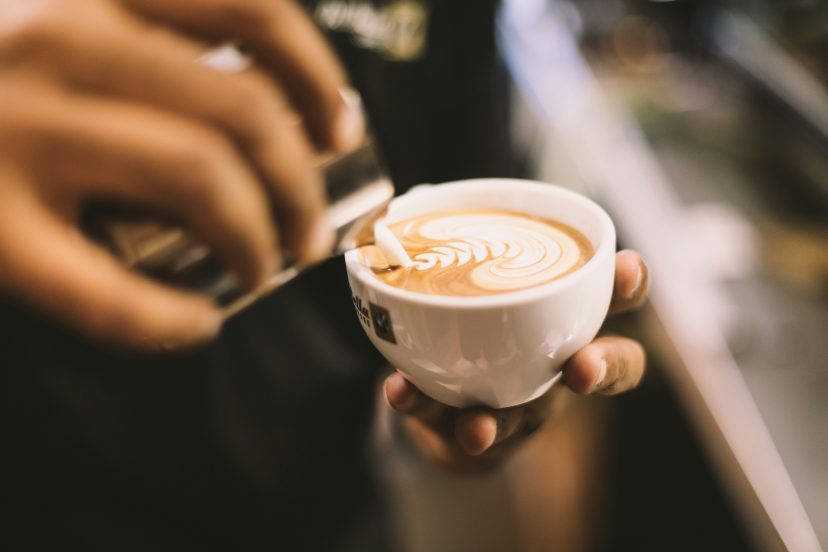
1. Free Pouring: The Classic Approach
This is what most baristas use. It involves pouring steamed milk directly into the espresso while shaping it into forms like hearts, tulips, and rosettas. Start slow, keep the cup tilted, and move your pitcher gently.
It may take a few tries (or ten!), but once you get the feel, it becomes almost meditative.
2. Etching: Drawing With Intention
After you pour your milk, use a latte pen to drag lines through the foam or dot details. This method is great for more intricate designs like flowers, animals, or even writing messages like “Good Morning!”
Etching gives you full artistic control and is forgiving since you can use the pen to clean up small mistakes.
3. Using Stencils: Fast Yet Fancy
If you’re short on time or confidence, this is your go-to. Use a stencil, a dash of powder, and voilà—you’ve got a perfect design that looks café-worthy. It’s especially great for holidays or when you’re serving guests.
Best Coffee Art Tools on Amazon
Let’s recap with a quick shopping list you can keep on hand:
| Tool | Why You Need It | Link |
| PowerLix Milk Frother | Smooth foam for any milk type | Buy Now |
| Latte Art Pen | Add details and custom shapes | Buy Now |
| Rattleware Pitcher | Easy control and pouring accuracy | Buy Now |
| Breville Bambino Plus | Café-quality espresso at home | Buy Now |
| Stencil Set | Quick latte art for any skill level | Buy Now |
The Psychology Behind Beautiful Coffee
Latte art does more than make your drink look pretty—it actually transforms how we perceive flavor, quality, and even value.
A compelling study on the visual value of latte art revealed that consumers are willing to pay up to 13% more for a latte topped with decorative foam art, regardless of any actual change in taste. This highlights how powerful visual presentation can be in shaping our expectations and enjoyment.
In fact, researchers in a related study on how latte art enhances perceived quality found that visually appealing designs increased customer satisfaction, suggesting that aesthetics activate positive emotional responses.
Whether you’re pouring a heart, tulip, or rosetta, these small touches not only add beauty to your cup but also tap into the psychology of pleasure—turning a simple coffee into a memorable sensory experience.
Final Thoughts
You don’t need fancy gear to enjoy the magic of latte art. With the right coffee art tools and a bit of practice, your morning coffee can become a creative ritual. For a smooth base that’s gentle on the stomach, try this organic low acid coffee—perfect for showcasing your foam designs. Even simple patterns can add a touch of joy to your day. So grab your frother, pour with heart, and turn every cup into a small work of art.
FAQs
1. What kind of milk works best for coffee art?
Whole milk creates the richest foam due to its fat content, but barista-style oat milk is a great plant-based alternative that still froths well.
2. Can I do coffee art without an espresso machine?
Yes. While espresso machines give the best results, you can use strong coffee from a moka pot or AeroPress and froth the milk separately.
3. How do I make frothy milk at home?
Use a milk frother, steam wand, or even a French press. Heat your milk, froth it until creamy, and tap the container on the counter to remove large bubbles.
4. What’s the difference between a latte pen and a stencil?
A latte pen lets you draw unique, custom designs. Stencils, on the other hand, provide a ready-made shape for powder to be sprinkled over.
5. Do I need barista training to learn coffee art?
Not at all. Many latte artists are self-taught. You’ll find tons of free tutorials online, and the most important ingredient is patience.